Organizing photos is a very important task to do as soon as you begin bird photography. On a typical birding day, you could easily take 300-500 pictures. Keeping all your photos organized without the help of some software can be a difficult and time-consuming task. There are a handful of different applications that can be used to organize—but the industry standard tool is Adobe Lightroom. This guide will be focusing on organizing photos using Lightroom but you can apply similar practices to other programs. If your photos are already organized, read our beginner’s guide to editing photos using Lightroom.
2022 Update
Lightroom vs. Lightroom Classic organization
In a nutshell, the new version of Lightroom CC (just known now as ‘Lightroom’) stores your photos in the cloud. Rather than be organized in folders, if you use this new version of Lightroom, you’ll instead create albums to organize photos into. This differs from Lightroom Classic where you typically organize photos by the file structure.
I recently transition to the new version of Lightroom and away from Classic. It offers a more streamlined interface and I like that I can import photos on my iPad and edit them on my other devices. I opted for the 1TB Adobe Cloud storage plan as a second backup of my photos in addition to my Backblaze PC backup.
Bonus: Removing noise from bird photos
Keep your photos safe
Don’t lose a lifetime’s worth of bird photos because of hard drive failure, corruption, or theft.
It doesn’t matter if you have the most well-organized photo library ever, if something tragic happens to your computer or hard drive, it will all be for nothing. Don’t lose a lifetime’s worth of bird photos because of hard drive failure, corruption, or theft. Backups are important. Local backups are great, but I highly, highly recommend you to do regular online backups as well. Backing up your photos to a cloud service like CrashPlan or Backblaze is super easy and will ensure that your photos will always be safe.
I personally use CrashPlan. It runs in the background and backs up all my photos and my other files without any manual work. I just chose which folders on my computer to back up and let it do its thing. Both Crashplan and Backblaze are excellent services and offer unlimited storage space for just $5 a month.
After you decide on an online backup service, make sure to back up the entire “Lightroom” folder (its default location is inside the photos folder). This folder contains your Lightroom catalogue file which holds all the important information that comprises your photo library: ratings, flags, tags, edits, and more.
It all starts with the import
As you import photos from your camera into Lightroom you are presented with a handful of options, namely file renaming, file handling, and destination.
File Renaming
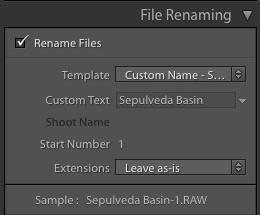
A good habit to get into is choosing descriptive names for your photos as you import them into Lightroom. On the right hand side of the image Check the Rename Files box and select “Custom Name – Sequence” from the ‘Template’ dropdown, then enter custom text for the name. I advise you to add the location in the name where the photos were taken. In the event you are just looking at files on your hard drive, seeing “Malibu Canyon-01” or “Sepulveda Basin-341” is much more helpful than something like “IMG-1067.” If you find yourself using specific naming conventions often, you can create new ones by clicking “edit” in the dropdown.
Destination
Lightroom will show you the folder tree where you can create new folders to organize photos into. For each new location, you go birding at, create a folder with the location name, enable the “Into Subfolder” option, and enter the date. This will arrange your photos by location and date.
Copy, Move, or Add
If you are importing photos from your camera, the default option “Copy” is what you want. However, if you need to organize photos that are already on your computer, you should choose either Move or Add. This will depend on if you want to move them into a new folder or leave them in their current location.
How granular do you want to get?
Once your photos are all neatly organized into folders, it is time to go crazy with further organization. You can choose to stop here, but Lightroom lets you add so much more info to your pictures to better find photos in the future.
Adding Keywords to Photos
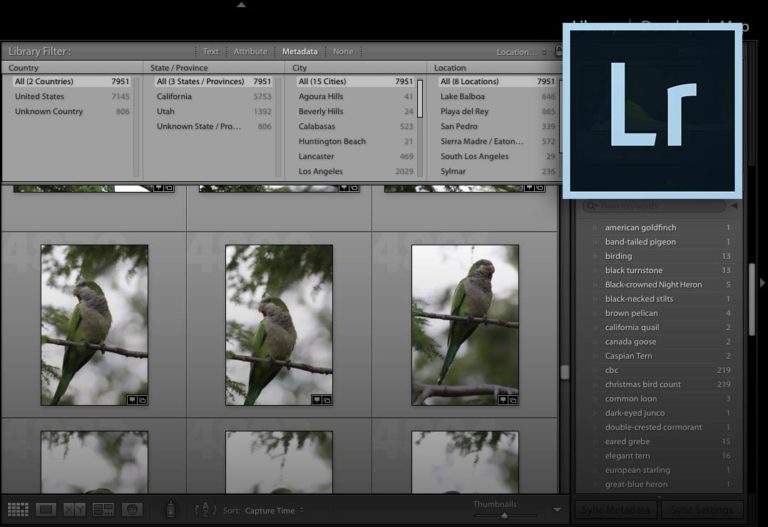
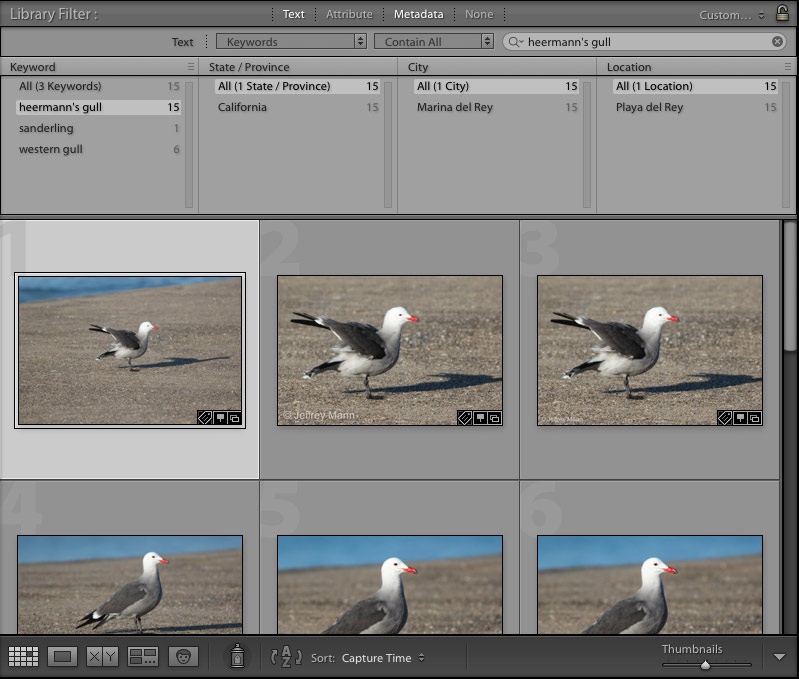
Arguably, tagging (keywording) your photos is easily the most time-consuming part of your organizational endeavors, but it’s worth it. The most obvious keyword to add to your photos is the bird species present in each image. Having the species keyword in all your favorite images lets you easily search for them and see every photo of that bird no matter where or when you snapped them. The keywords are powerful, you can tag photos with the bird’s family name, main plumage colors, habitat, or anything! Whatever parameters you may want to search by should be added.
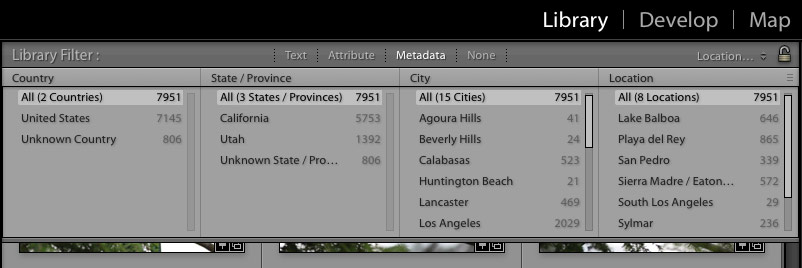
To search by keyword, go to ‘grid view,’ click on Text in the Library Filter bar and enter a species name. You can also click Metadata (as shown in the example) to further refine your search based on location or other available info.
To add keywords to multiple photos in Lightroom, change your view from Loupe to Grid view. Then multiple photos can be selected and keywords added.
Geotagging
You can add coordinate metadata to your photos in Lightroom by navigating to Map page, searching for a location, then dragging the photos onto the proper location in the map. You can select multiple photos at once by pressing either CMD+A or Ctrl+A or holding SHIFT and clicking on the first and last photo of a group. Bulk geotagging does not require a grid view like keywords do.
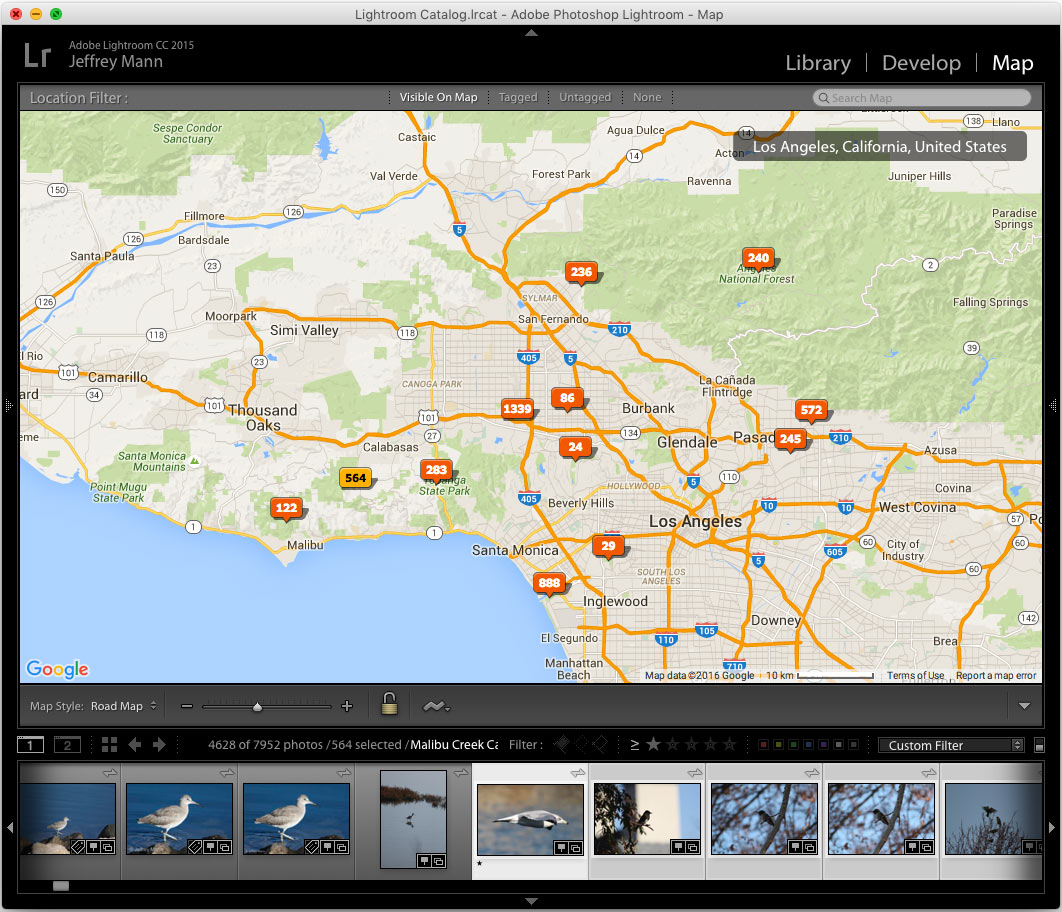
Like keywords, once all your images are geotagged, Lightroom allows you to use the ‘Library Filter Bar’s’ metadata option to browse all the photos taken in a particular city, state, or location. Photos can also be browsed on the map page too, of course.
Star Rating
Star ratings are essential to your Lightroom editing workflow. When you are going through a fresh import of photos, giving a star rating to the day’s best photos helps narrow down which ones you will ultimately spend time editing. My workflow consists of giving a 1-star rating to any photos with potential, after editing, photos are given 5 stars. This makes it easier to view edited photos when I am ready to publish them online.
Flags and other metadata
Colored flags and other data fields can be added to each image if needed. The possibilities are endless.
What if you already have a bunch of photos on your computer to organize?
Lightroom’s import function can be used to move images from one part of your computer to another, or like was mentioned earlier, by selecting ‘Add,’ you can edit in Lightroom without physically moving the photos. Bulk editing is handy to rename multiple photos at the same time. In the “Library” section simply select the pictures then click the 3-lined icon next to the “File Name” field in the right sidebar and choose the desired options.
How do you like to keyword and arrange your photos? Let us know in the comments.